
Make a little happiness in minutes.

This smart little cutting and writing machine makes it easy to personalize almost anything.
Where are my crafters at? I have been wanting to share a post with you since June all about the new Cricut Joy, but due to the Covid pandemic, I had to move my post out to now, as I wanted to showcase three little things that you can make with the Cricut Joy, especially with teachers in mind. My original post that I wanted to share in June was going to showcase two easy and inexpensive end of school gifts that kids could Cricut themselves with your help, to give to their teachers for all their hard work and support through the school year. In addition to the teacher gifts, I was also going to show you how you can use the new Cricut Joy to make summer-time birthday and holiday cards in under 3 minutes -- yes, you read that right -- you can make your own greeting cards in minutes thanks to the Cricut Joy. But, with schools closing abruptly and moving to distance learning, I didn't want to share end of year teacher gifts, as everything was up in the air and many kids were not able to say goodbye in person to their teachers. Also, summer birthdays and holiday gatherings were also a no-no with self-quarantining and social distancing. I don't have to tell you how crazy most of 2020 has been. What I will say is that we are slowly moving to normalcy with kids going back to school in person, part time school and remote learning, or full distance learning. But, teachers more than ever need to be shown just how much they are appreciated and needed, as all of us parents especially have had to step into their shoes to assist our kids with online schooling the last few months of school this past spring, and will be doing the same as the new school year kicks off soon.
So, I thought now is the time to share how the Cricut Joy can be used to create some great gifts that kids can gift their teachers when they head back to the classroom full- or part-time, or when they go and grab their school supplies for the semester and meet their new teachers. What teacher wouldn't want to receive a greeting card from their students, or even a personalized storage bin to store and organize their pens, markers, pencils, scissors, etc. on their desk at school or at their desk at home that they will be working remotely. I have a few friends who are elementary school teachers, and they have had to make space in their homes for a temporary classroom to host their virtual classrooms, and they are all scrambling for ways to keep their school supplies separate from their family stuff. And, thanks to the Cricut Joy and all the extra time I have had over the past few months playing and creating with it, I came up with the perfect projects that novice or advanced Cricut users can make in minutes, anywhere in their house (including the kitchen counter, dining room table, coffee table in the living, etc....you get the picture -- you don't need a craft room to craft to your hearts content when you pull out and use your Cricut Joy). :-)
Before I go into the three quick and easy projects I made with my new Cricut Joy, I wanted to give you a little introduction to this new machine, which hit store shelves back in the spring.

At under $200, this little machine is a must have for crafters and those who love to make DIY gifts. Like I mentioned above, it is so compact that you don't need a separate craft room or table for it. You can use it practically anywhere you have a small table or workspace in your house, near an outlet to plug it in. I have even had a friend who bought the Cricut Joy after I couldn't stop raving about it, buy one and bring it along to craft in her camping this past summer. She was having a blast creating greeting cards, labels and more in her camper, while traveling throughout the Northeast with her family. All she needed was a tray table she said and a bin full of her Cricut Joy vinyl, insert cards, markets, etc. and she was good to go. :-) I loved getting her emails and seeing what she was making with her Cricut Joy. You could tell that she was loving this new compact machine just as much as I was.
What you need to know about the Cricut Joy, and why this is a must have even if you already own a Cricut machine?

If you have always wanted to get a Cricut machine but couldn't see buying because you don't have a designated craft room or space for the machine and all the accessories and tools you need to create with, well now do you don't have to say no in investing in a Cricut machine as the Cricut Joy is made with you and your limited space in mind.


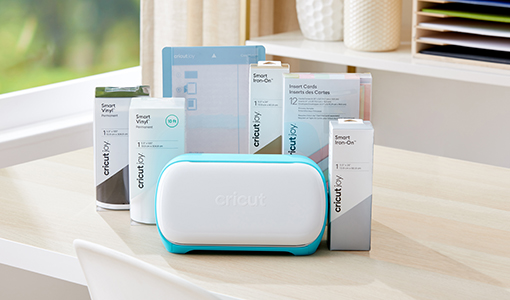
Just look at the Cricut Joy above and you will see how compact this machine truly is. It weighs less than 4 lbs. and can store in a cubby or on a shelf when not in use. Or, you can pick up a Cricut Joy storage bag (see grey bag in photo above and below) and leave in the hall closet when not in use.


Just look at the Cricut Joy above and you will see how compact this machine truly is. It weighs less than 4 lbs. and can store in a cubby or on a shelf when not in use. Or, you can pick up a Cricut Joy storage bag (see grey bag in photo above and below) and leave in the hall closet when not in use.

In addition to not taking up a lot of space in your home, when it comes to using the Cricut Joy, you can make super easy and super fast projects without the need of a cutting mat. As you know, I have a Cricut Maker® and have to clear enough space on my craft table to accommodate the different cutting mats when I am making cuts and projects with my larger Cricut machine. This can become an issue especially now with my girls needing their own desks for online schooling. I have had to give up some of my craft space to accommodate them and their computers and school supplies.
I have never had an issue setting up and using my full-size Cricut Maker®, and was happy to find that the same was true when using the Cricut Joy for the first time. In fact, setting up the Cricut Maker® was even easier and faster than the Cricut Maker®. From the moment I took the Cricut Joy out of the box to setting it up, and then creating my first custom insert greeting card, it was all done in less than 15 minutes, which truly amazed me.


Even though this machine is compact, there is so much you can make with your Cricut Joy. This smart little cutting and writing machine can make custom vinyl decals for water bottles or your wall, make labels for your kitchen or office, and even be used to make custom greeting cards, invitations, place cards, and even a birthday banner in record time. The Cricut Joy is "compatible with Cricut Smart Materials™, for super-easy, super-long cuts without a cutting mat. Just load and go!"
Like I said above, even a novice crafter or Cricut user can get up and running with their Cricut Joy and turn out unique projects in under 15 minutes. And, with so many step-by-step projects, With plenty of projects that take just 15 minutes, using the Cricut Design Space® software. The Cricut Joy makes it possible to make something unique for you – or anyone – at a moment's notice, anywhere in your home. It's the perfect companion to full-size Cricut Maker® and Cricut Explore® machines, or even as a first Cricut machine for those looking to get more experienced with DIY crafting and creating. Just know that once you try the Cricut Joy, you will want a full-size machine and all the different accessories (vinyls, iron-ons, fabrics, markers, etc.) as you will keep coming up with new inspiration and ideas to create one of a kind creations for you, your family, friends, and others.
Key Cricut Joy Features:

- Weighing in at only 3.9 lbs (1.75 kg), this smart little cutting and writing machine makes it easy to personalize almost anything
- Compact & Portable: Cricut Joy is Cricut’s smallest smart cutting machine ever! It fits in a cubby or looks great on a counter. Cricut Joy packs away easily and sets up instantly, making it super easy to move from room to room. Not having to transport a mat, combined with the smaller material size, makes the whole system compact and portable. No craft room required.
- Cuts 50+ materials, including iron-on, cardstock, vinyl, paper, and Smart Materials™ – super-easy, super-long cuts without a cutting mat
- Mats optional! Cricut Joy has a full suite of brand-new materials that do not require a mat, meaning less to buy, fewer steps, and faster results. New Smart vinyl comes in extended sizes, with up to 20’ repeated cut capability, and no need to switch out multiple mats.
- Draws any shape and writes in a variety of styles
- Cuts individual shapes up to 4 ft long or makes repeated cuts up to 20 ft long*
- Fits in a cubby, packs away easily, sets up instantly
- Perfect companion to full-size Cricut smart cutting machines. If you already have a Maker or Air 2, Cricut Joy opens additional creative possibilities with unique features and is the perfect companion for quick, mat-free projects and long cuts.
- Bluetooth® wireless technology
- Design Space® software for iOS, Android™, Windows®, and Mac® - Get the Cricut Joy App here: https://apps.apple.com/us/app/cricut-joy-quick-simple-diy/id1516512746

This new iOS companion app features a guided design experience that makes simple, everyday projects – like labels, stickers, iron-on transfers – quicker & easier than ever.
---
Now that I have introduced to you the new Cricut Joy, I wanted to share three quick and easy projects that I made recently -- well actually two, as my 10 year old daughter took the reins on the teacher storage caddy bin and did that Cricut project all by herself. She saw just how much fun I was having playing around with my new Cricut Joy this past spring, and was quick to want to learn how to use so that she could create fun cards to send to her friends while in quarantine, and vinyl decals to put on your laptop, back of her phone and to spruce up her plain water bottles. In no time at all, she was teaching her younger sister and father on how to use the Cricut Joy as well as our Cricut Maker®, so that they could make their own iron on designs, vinyl decals, etc.
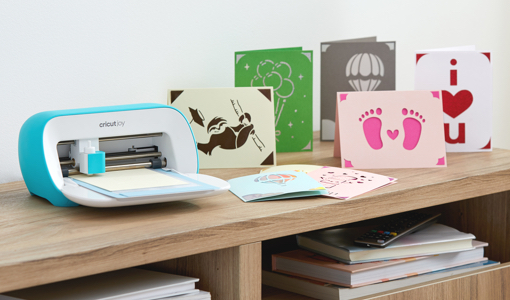
First up, I wanted to show a cute teacher card I made using the Cricut Joy exclusive blank insert card sets, which let you create unique and stunning results in a moment's notice. This particular card I was able to make in under 3 minutes, even though all the detailing and cut outs look like it would have taken a long time to do.


What teacher wouldn't want to receive this card from a student? Even though my girls are homeschooled, they still do outside the house homeschool classes and have teachers that they see in a classroom setting on a regular basis. My girls are always making greeting cards and notes on blank white paper to give them, as a way to say thanks for the fun classes they teach and just for being an A+ teacher. Well, now, they can create a breathtaking card that their teachers will want to display for all to see and admire in minutes, thanks to our Cricut Joy.
Want to make this "You're an A+ Teacher" card for your kids to give their teachers when they return to school? Here are the easy to follow, step-by-step instructions I took to make this unique card using the Cricut Joy and the exclusive black insert card sets available through for purchase through the online Cricut.com store as well as at most major craft retailers including Michaels (in store and online).
A+ Teacher Card:

First, you want to gather all the supplies you will need to make the card, as well as make sure you have the Design Space® app downloaded to your iOS, Android™, Windows®, and Mac®. You can download it here: https://apps.apple.com/us/app/cricut-joy-quick-simple-diy/id1516512746.
For this particular card, you will need the the Cricut Joy machine, the Cricut Joy Card Mat, a Scraper, as well as the Cricut Joy Insert Cards, Rainbow Scales Sampler.

Once you have your supplies ready and the Cricut Joy turned on, you want to head over to https://design.cricut.com/

1. Make sure you select the correct material. We are using the Cardstock - Insert Card Cardstock for this card.

2. Then, load the tools and materials, as seen in the photo below...


It should look like this. Make sure the insert card is secure to the mat so it doesn't bunch up when the Cricut Joy starts cutting.


3. Tap go and watch the magic happen! :-)


Ta-da! Here is what the A+ Teacher cut looks like once it is done.

Grab your scraper and slowly pull away the cut out pieces from the outside of the card. I have found that if you gently hold the scraper against the cut outs and slowly pull up the card, the cutouts stick to the Cricut card mat.


This is what the card looks like once you remove the cut out pieces...

Grab your colored card insert and slide it into the slots to finish up your card like this...

And, this was all done in a few minutes time...how great is that?! :-)


In addition to using the Cricut Joy to cut and add designs to the blank insert card sets, you can also use the new Cricut Joy to write, too! Thanks to a full suite of Cricut Joy-compatible pens, with a variety of pen types and line weights, you can have your Cricut Joy draw and write in a variety of styles directly on your Cricut Joy exclusive blank insert card sets. I couldn't wait to try out this feature on a birthday card for my oldest daughter, who turned 10 in July. She is a huge animal lover, especially cats, so when I saw this particular design template in the Cricut Design Space®, I knew she would love and cherish the card, which she did -- she has it hanging on her bedroom room to admire and for all to see that come into her room. :-)
You will follow the same steps as above like we did with the A+ Teacher card, in that you want to gather the same materials -- Cricut Joy machine, the Cricut Joy Card Mat, the weeding tool, as well as the Cricut Joy Insert Cards, Rainbow Scales Sampler. You will also need the Cricut Joy markers to draw the outline of the cat and other designs on the front of the card.

Once you have all your materials, head on over to this link in the Cricut Design Space, and then follow the step-by-step instructions, first selecting the material type, loading the card onto the card mat and into the Cricut Joy machine. You will be using the Cricut Joy marker first to draw the cat and other illustrations on the front of the card. Once the drawings with the Cricut markers are done, you will then switch out the marker with the Cricut fine-point blade into the Cricut Joy machine cartridge.

You will go through the same steps, but this time it will be for cutting the balloons, party hat, sun and present bow into the front of your card. Make sure you resume the process in order for the Cricut Joy to continue making the cuts in the front of the card. After that, use your weeding tool to separate the cut out pieces from the card. Your card should look like this once you have done that....

The final step is to insert the colored backing to the card, just like we did with the A+ Teacher card. :-)


I am not artistic and can't even draw a stick figure, so I love how I can use the Cricut Joy and my Cricut Maker to draw amazing and very detailed illustrations onto greeting cards and other Cricut material, that looks like it would cost a lot of money in a store or need to be done by a skilled artist. Shh, we can keep this as our secret and say that we did it all when talking up our Cricut creations to family and friends. :-)
---

My final craft project I wanted to share with you (as three's the charm) is the Teacher Storage Caddy, which we used the Cricut Joy to add a vinyl decal to the side of a metal caddy, so that you can gift this to your child's teacher this year, and help them stay organized with all their pens, pencils, scissors, markers, etc.

As I mentioned in the beginning of my post, my 10-year daughter created the vinyl decal to add to the metal caddy we picked up at the craft store for us to keep our homeschooling writing and drawing supplies organized.

I uploaded the .svg file into the Cricut Design Space, which you can access here: https://design.cricut.com/landing/project-detail/5f4405cb7f3cd0029c1b6098.

I uploaded the .svg file into the Cricut Design Space, which you can access here: https://design.cricut.com/landing/project-detail/5f4405cb7f3cd0029c1b6098.
Just like with the two previous Cricut Joy projects, you want to first gather all the supplies you need for the project, which includes your Cricut Joy, Cricut Joy Vinyl (we use three colors for this particular project - green, white and red), scraper, and weeding tool, and Cricut Joy transfer paper.

Then, head on over to this link in the Cricut Design Space https://design.cricut.com/landing/project-detail/5f4405cb7f3cd0029c1b6098, and follow the step-by-step instructions, making sure you check off the right materials (Cricut Joy vinyl) you are using for this project, and continuing through the setup, sending the job over to your Cricut Joy to complete.

Once you have the your vinyl design cut out, you want to remove the excess material around your design cut outs, as seen below...


Now, you are ready to peel and stick the vinyl cutout to your metal caddy. Make sure you clean the surface of the metal caddy or area on the product you will affixing the vinyl to, so it sticks properly.

Once placed where you want it, use the scraper again to smooth out your vinyl, removing air bubbles and wrinkles. Slowly remove the transfer paper backing, starting from one corner and working your way to the opposite side.

My daughter also said that this would make for a great teacher gift for her friends who attend public school to gift to their new teachers upon returning back to school...and, I couldn't agree with her more.
We have been using our storage caddy and I love how I don't have mason jars all over the place anymore holding colored pencils, markers, highlighters, pens and pencils. Everything is now in one holder and can be carried to the dining room table or their desks, when school is in session. :-)

Then, head on over to this link in the Cricut Design Space https://design.cricut.com/landing/project-detail/5f4405cb7f3cd0029c1b6098, and follow the step-by-step instructions, making sure you check off the right materials (Cricut Joy vinyl) you are using for this project, and continuing through the setup, sending the job over to your Cricut Joy to complete.

Once you have the your vinyl design cut out, you want to remove the excess material around your design cut outs, as seen below...

The next step is to add your vinyl cutout to the Cricut Joy transfer paper. Make sure you line up your design properly because once you remove the vinyl backing paper and stick to the transfer paper, you can't adjust or remove it without ruining the design. You also want to use the Cricut scraper to remove any air bubbles and wrinkles once you apply your vinyl design to the transfer paper.

Now, you are ready to peel and stick the vinyl cutout to your metal caddy. Make sure you clean the surface of the metal caddy or area on the product you will affixing the vinyl to, so it sticks properly.

Once placed where you want it, use the scraper again to smooth out your vinyl, removing air bubbles and wrinkles. Slowly remove the transfer paper backing, starting from one corner and working your way to the opposite side.

My daughter also said that this would make for a great teacher gift for her friends who attend public school to gift to their new teachers upon returning back to school...and, I couldn't agree with her more.
We have been using our storage caddy and I love how I don't have mason jars all over the place anymore holding colored pencils, markers, highlighters, pens and pencils. Everything is now in one holder and can be carried to the dining room table or their desks, when school is in session. :-)
----
As you can see with the three easy to make projects I shared above -- the two greeting cards and the vinyl decal for the teacher's storage caddy organizer, the Cricut Joy really is a must have for crafters and DIY gifters, even if you already own a Cricut machine.

It is so compact and can be pulled out at a moments notice to make a custom greeting cards, labels, wall decals, etc.


There are so many things you can make with the Cricut Joy, and not needing a lot of space or designated craft room/space, makes the Cricut Joy your go to Cricut machine for spur of the moment projects.

You can learn more about the Cricut Joy and all its accessories and supplies, as well as all the other Cricut machines and products available by visiting Cricut.com. The Cricut Joy is available now online and in-store, ready for you to pick up and get your crafting on. I can't wait to see what you create with your Cricut Joy, and hear how you are loving this new compact Cricut machine just as much as your other Cricut machines.

You will find that you can't stop raving about it with family and friends and other Cricut machine owners, as you create and design new unique projects to share, or to help you get more organized at home -- think labeling the pantry shelves, storage bins, etc. now that you are home and organizing your space more and getting rid of things you don't need anymore.

It is so compact and can be pulled out at a moments notice to make a custom greeting cards, labels, wall decals, etc.
There are so many things you can make with the Cricut Joy, and not needing a lot of space or designated craft room/space, makes the Cricut Joy your go to Cricut machine for spur of the moment projects.

You can learn more about the Cricut Joy and all its accessories and supplies, as well as all the other Cricut machines and products available by visiting Cricut.com. The Cricut Joy is available now online and in-store, ready for you to pick up and get your crafting on. I can't wait to see what you create with your Cricut Joy, and hear how you are loving this new compact Cricut machine just as much as your other Cricut machines.

You will find that you can't stop raving about it with family and friends and other Cricut machine owners, as you create and design new unique projects to share, or to help you get more organized at home -- think labeling the pantry shelves, storage bins, etc. now that you are home and organizing your space more and getting rid of things you don't need anymore.
Stay up to date on all things Cricut-related, including new product additions, fun and easy step-by-step seasonal craft ideas, sales and more by following Cricut on their social media channels below...
- Cricut on Facebook: https://www.facebook.com/OfficialCricut/
- Cricut on Instagram: https://www.instagram.com/officialcricut/
- Cricut on Twitter: https://twitter.com/OfficialCricut
- Cricut on Pinterest: https://www.pinterest.com/Cricut/
No comments :
Post a Comment